In my previous four blogs I covered how Diamond Light Source was built. I was lucky to be part of a team that was in the heart of the all the work that was being done. I was always on hand to see what was going on and always had a camera at hand even though at first it was the Vacuum groups digital camera. Over the years I took my own camera around with me taking photos of some of the interesting things I happened to see. This blog will show you how Diamond looks today and a lot of the photos were taken in the months before I retired.
Diamond House the first place you visit before your tour around the facility, the front here is due to be extended in 2020
The atrium in Diamond House where you will start your tour
you might see the odd Dinosaur if you were lucky
you might see the odd Dinosaur if you were lucky
Going along this bridge to the Experimental hall
You pass by the control room where the look after the running of the storage ring
Welcome to the Experimental Hall, the was the view that I saw each day I went to work in the centre of the building
You pass by the control room where the look after the running of the storage ring
Welcome to the Experimental Hall, the was the view that I saw each day I went to work in the centre of the building
Walking around the outside of the hall you come to Zone 5 where there is another bridge that would take you to the centre and the stores where I worked from

This is the view from the walkway by the office I worked from that I would see everyday
The Vacuum Stores

This is the view from the walkway by the office I worked from that I would see everyday
The Vacuum Stores
full of equipment that is needed
which is used most days
The Booster wedge were I helped build and test the equipment we used
Maintained the pump carts, there were thirty of these around the place and all needed looking after
and looked after leak detectors though I had to get the service engineers in if there was a problem with them that I could not sort out. There are around 21 scattered around the hall.
R79 is where more work is done but few people see what goes on
Even fewer see me helping out
even less will witness this operation on a set of inter girder bellows

Checking out the alignment with an endoscope before it is closed up and the vacuum pumped
I'm stood beside one of these, this is an ID or Insertion Device, in fact this one is what is termed an In-vac one. There are a series of very strong magnets that open and close to causing the light beam to wiggle
They do vary in looks and size, this is a different version
On either end of the ID's you will see one of these which is a pumping station
If you walk a bit further up from those Id's I showed, you will see this are, it's the Booster to Storage ring line and is where the light beam from the Booster joins the main storage ring
This is where it comes from the Booster
and this is where it bends around to join with the storage ring

This is the other side looking back to the area above
This the part where it joins
This are is quite congested but in the middle you can see a long green magnet that is the septum where the booster comes in from the left and joins the storage ring. Don't be fooled by the line over to the right that is a Font end that takes the beam out of the storage ring to an experimental hutch
This photo makes it even more congested. This is an area that people are not usually taken but I have seen visitors shown here
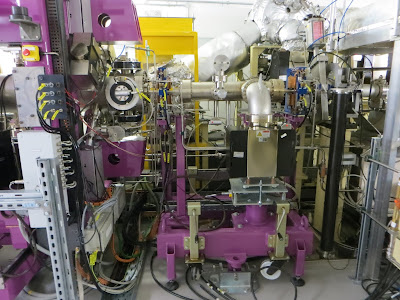
If you keep walking along you will come to this cell which is called DDBA or the Double-Double Bend Achromat (DDBA) Project It was a few years in the making and one of the last areas that was changed. The beamline through here is a lot smaller in section than the rest of the storage ring, it also has more bending magnets (the big green ones you see) the idea to give a much more powerful insertion device beamline
Further on along the ring you will come across another type ID this one is an Out Vac version meaning that there is no vacuum around the magnets. It is also one of the biggest being around 5 metres long
This is a closer view of the magnets top and bottom. The vessel between is a narrow Aluminium one specially manufactured to use for this purpose
There are also a couple of smaller versions fitted side by side
This was a bit of an experiment that one student from Germany was looking after, Not sure if it was a success. it was remover to go elsewhere and the area returned to how it was
This is the second one. Both were made in Russia and it one of the few things most people never see
Above an invac Insertion Device (ID) on pump after being installed
Left how they normally look

This is a mid girder a short section between two ID's

Another place the public rarely seen is the RF cavity these are superconducting and cooled by Liquid Helium They have their own Liquifier

Not far away you can find a could of room temperature Cavity's cooled by water
The Booster ring
looking towards here the Linac to Booster area where the light beam comes out of the Linac to join the Booster

This was the last thing I had anything to do with
I helped build this booster cavity
It was installed in place after I left
And just over a year later I returned as a Guide and took this photo of it in place
The my old team had done an impressive job placing it where it needed to go
Another place you will be shown is the Linac
The Linac Gun where the light beam is fired off
And travels along this copper tube
Long till it goes through the wall at the end to the Booster ring
This looks back the to the Linac Gun
This is probably the one place I was most proud being a part of building
Above getting ready to lift out a girder it weighs in the region of 14+ tons
and if you watch the video you can see how it is done.
The Storage ring is in a constant process of evolving with new beamlines being added or upgraded
Walk along the ground floor on the experimental hall and you pass by the hutches where the experiments are done
During shutdown many are open and you can see inside
it is all controlled by computer when it is running
part of one of the beamlines under maintenance
The building was also extended outside
The first extension was this one which was started in March 2008
It was right by our office
Followed by I13 you see in the distance
This the the beamlines under the slabs you see
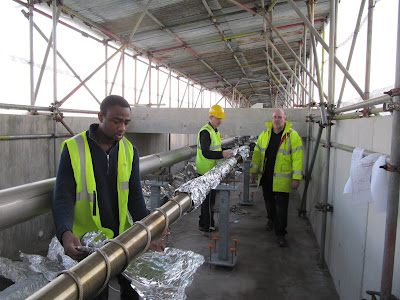
and the lads at work on them, I might add it was the end of January when this was done
I14 was the Next one which was finished only a year of so before I retired.
This is what is under the slabs you see, funny we also put this together in January as well
The last part that was added was I21 a blister on the side of the experimental hall
The beamline runs across the Experimental hall coming out inside here, the whole beamline can rotate through an arc on an air bearing and be raised up and down.
That is a little taster of Diamond Light Source and lets you see some of the place. There are open days every so often and you have to book on the Diamond website
You will be shown around by people who work there (even a few who have retired) and shown around the storage ring and beamlines and told how it works by the scientists and technicians

I will take you leave with this photo taken back in May 2008 a year or so after the place was up and running it is more or how it looks today. I hope have enjoyed this tour of Diamond Light Source and if you get the chance go along on a open day for a visit.
On 6th September 2023 Diamond Light Source got the 500million pounds it needs to upgrade to Diamond 2


I am endlessly fascinated by people's work places and how such places work! A behind-the-scenes look is always interesting, no matter what type of work is being done at a place.
ReplyDelete